MasterPass Merchant Branding Requirements
- MasterPass Merchant Branding Requirements

- Overview
- Consistent MasterPass Button Placement
- MasterPass Buttons
- When and Where to Use the Buttons
- MasterPass Buttons for Pre-checkout Data Display
- MasterPass Transactional Display Best Practices
- Confirm Order and Order Completion Pages
- “Learn More” Link Message
- Using the MasterPass Name in Headlines and Text
- Contact Us
Version 2.0, September 2014
MasterPass™ is a digital payment solution that simplifies the shopping experience. It enables consumers to pay with any payment card, anywhere, using any connected device.
This document is intended to orient merchants and their developers seeking to integrate MasterPass branding in their checkout environment, detailing the following:
- Basic use of MasterPass Buttons
- Effective integration of MasterPass Buttons so that consumer checkout is as quick and easy as possible
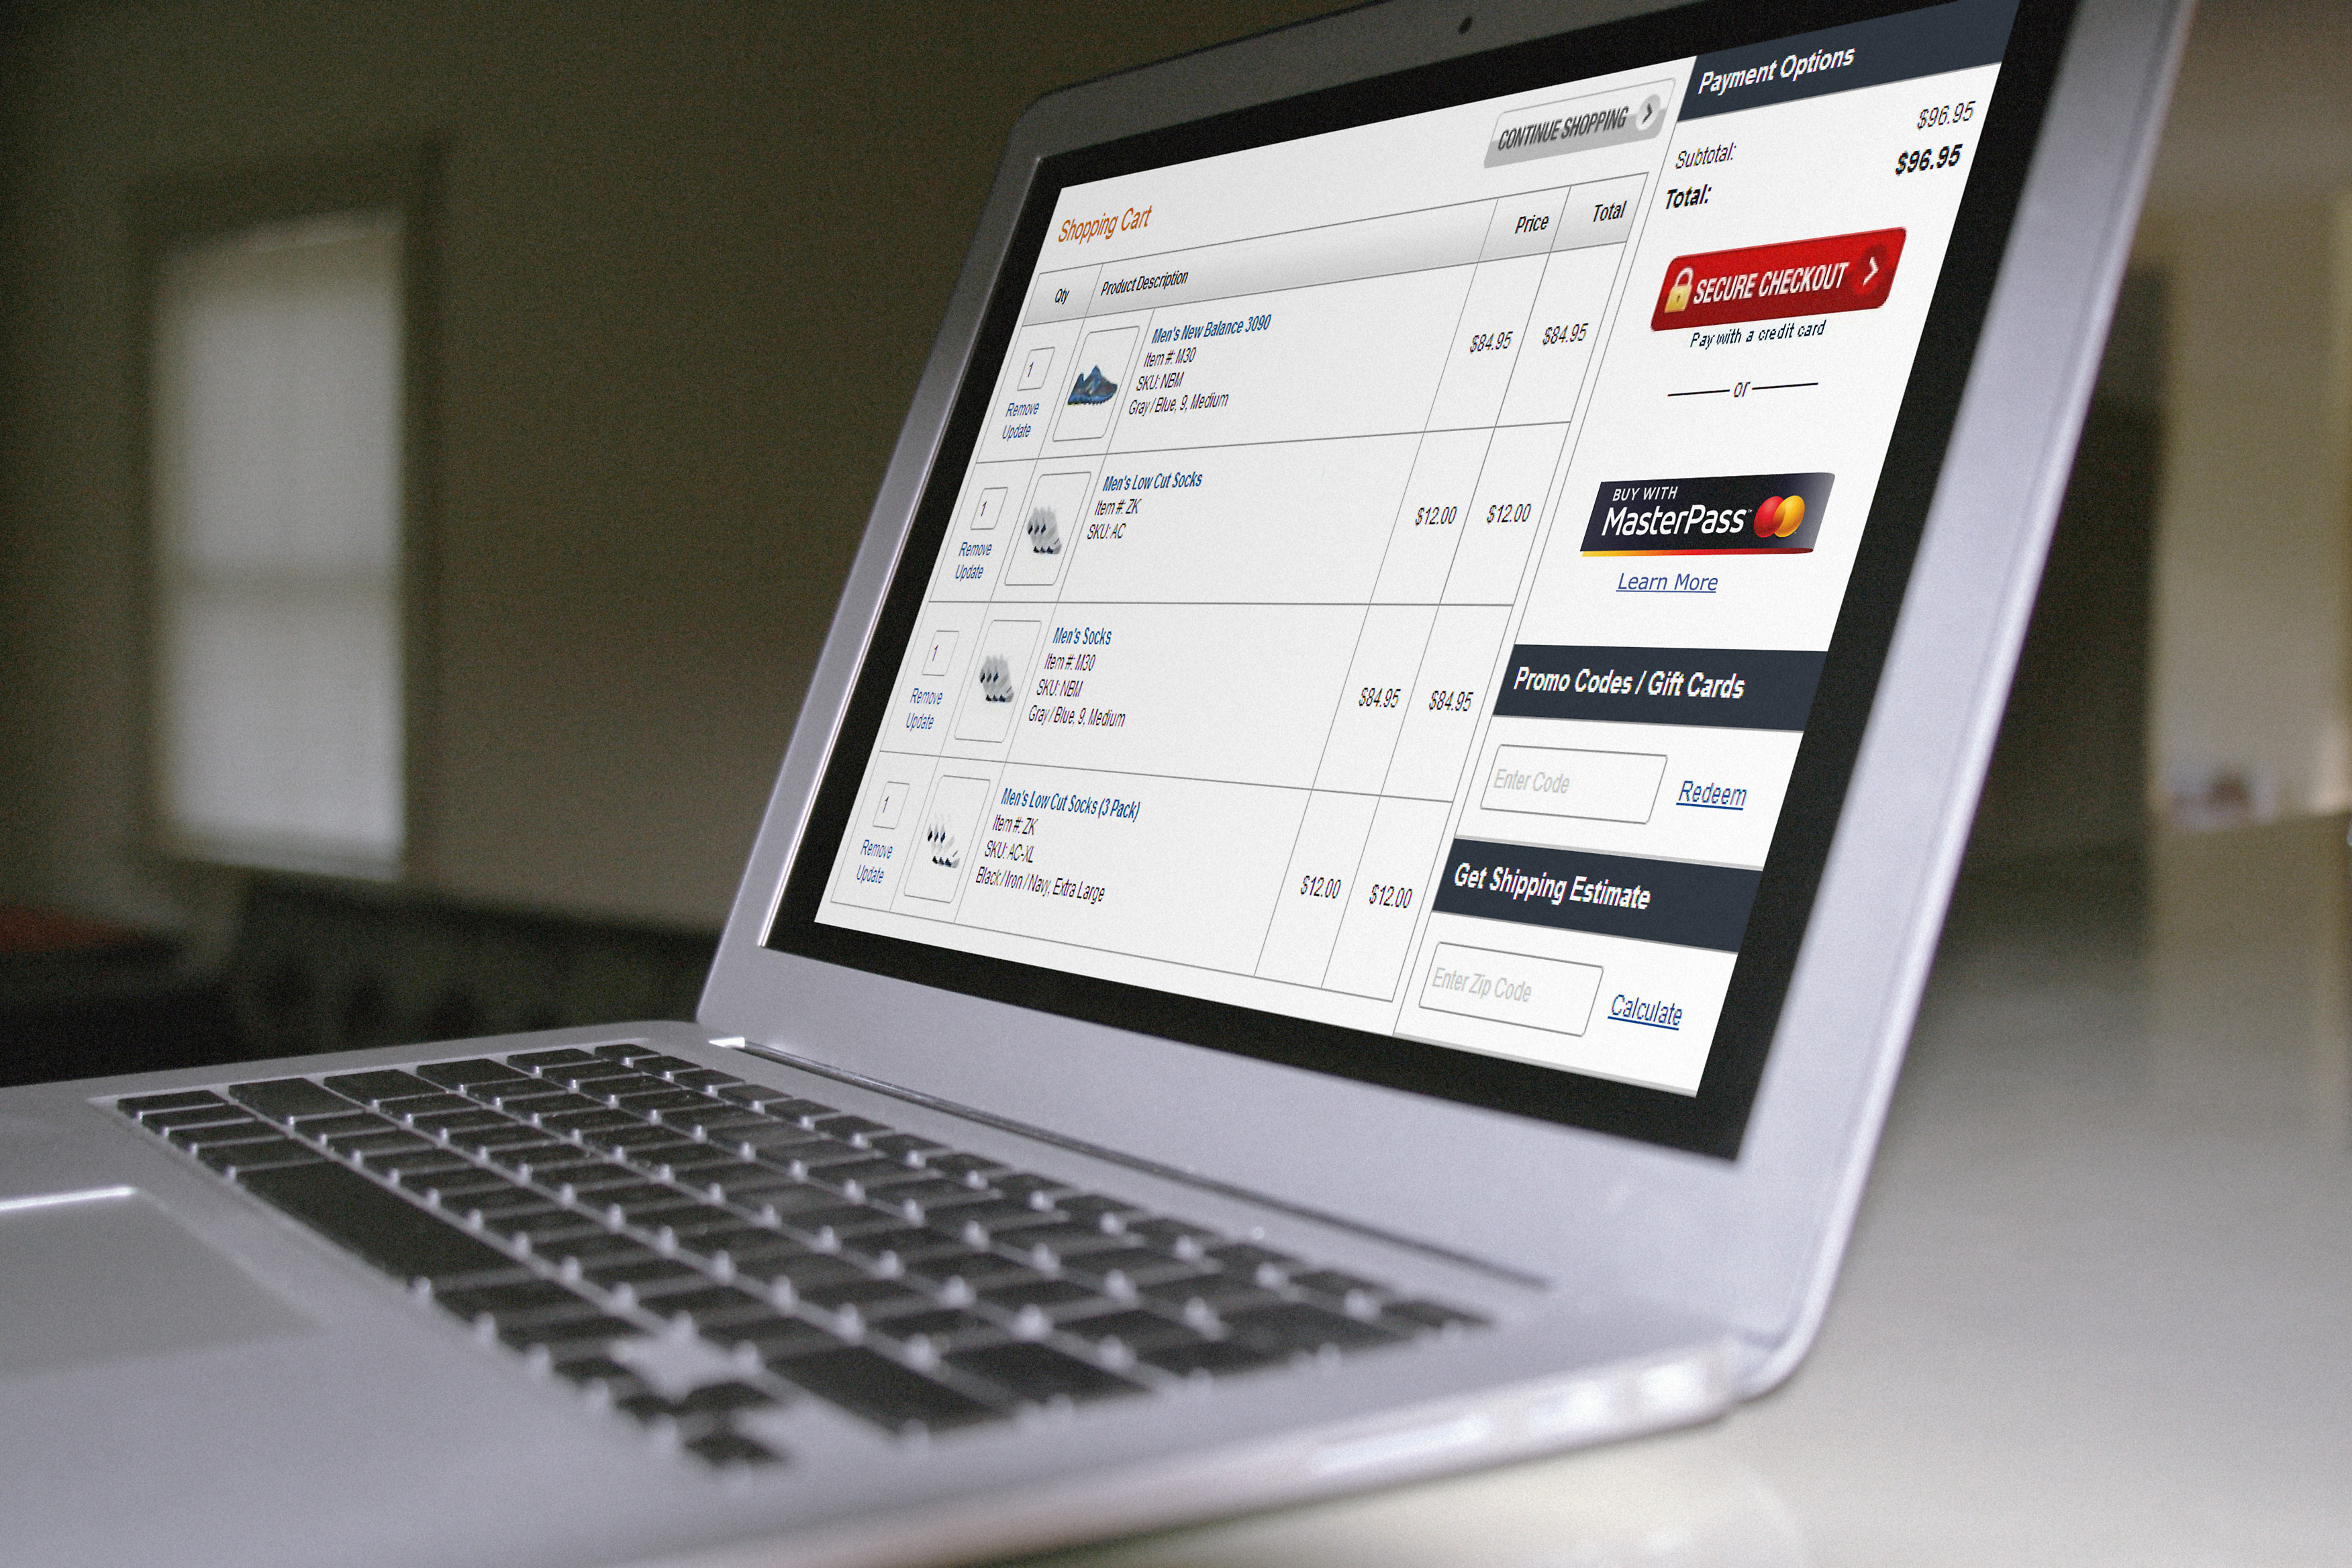
Consistent placement of the MasterPass ™ Buttons on merchant websites will improve the consumer shopping experience and help reduce cart abandonment. This is especially important on checkout pages. Consumers should develop an expectation of where the Buttons will appear, how the checkout process will be streamlined, and how the consumer’s information will be used across merchant experiences.
Following these requirements and guidelines will:
- Ensure correct placement in line with current merchant checkout flows
- Encourage greater usage and completion of more consumer transactions
- Reinforce the fundamental value proposition that consumers will not need to re-key any personal information that resides within their wallet
Placement Considerations
-
It is important to review the merchant website to understand current e-commerce checkout flows, including:
- Consumer information gathering points
- Checkout process
- Shopping cart
-
Button placement needs to reinforce the MasterPass consumer value proposition — a safe, simple, and secure transaction even on websites new to the consumer, minimizing their inputs and eliminating the need to reference their physical card. Additionally, the consumer should not have to provide CVC / CVV to the merchant as that information has been verified at the time the card is entered into the wallet. Data contained in the wallet includes:
- Card Information
- Name
- Email and Phone
- Shipping Address
- Billing Address
- Loyalty Program Information
-
Button placement should support the most convenient consumer checkout experience on the merchant site. Strong placement options include:
- The product page for quick checkout
- The page where personal ID / information is first being requested
The following three pages introduce the MasterPass ™ Buttons. Consistent use of these Buttons should improve the consumer shopping experience. There are several types of Buttons available for use.
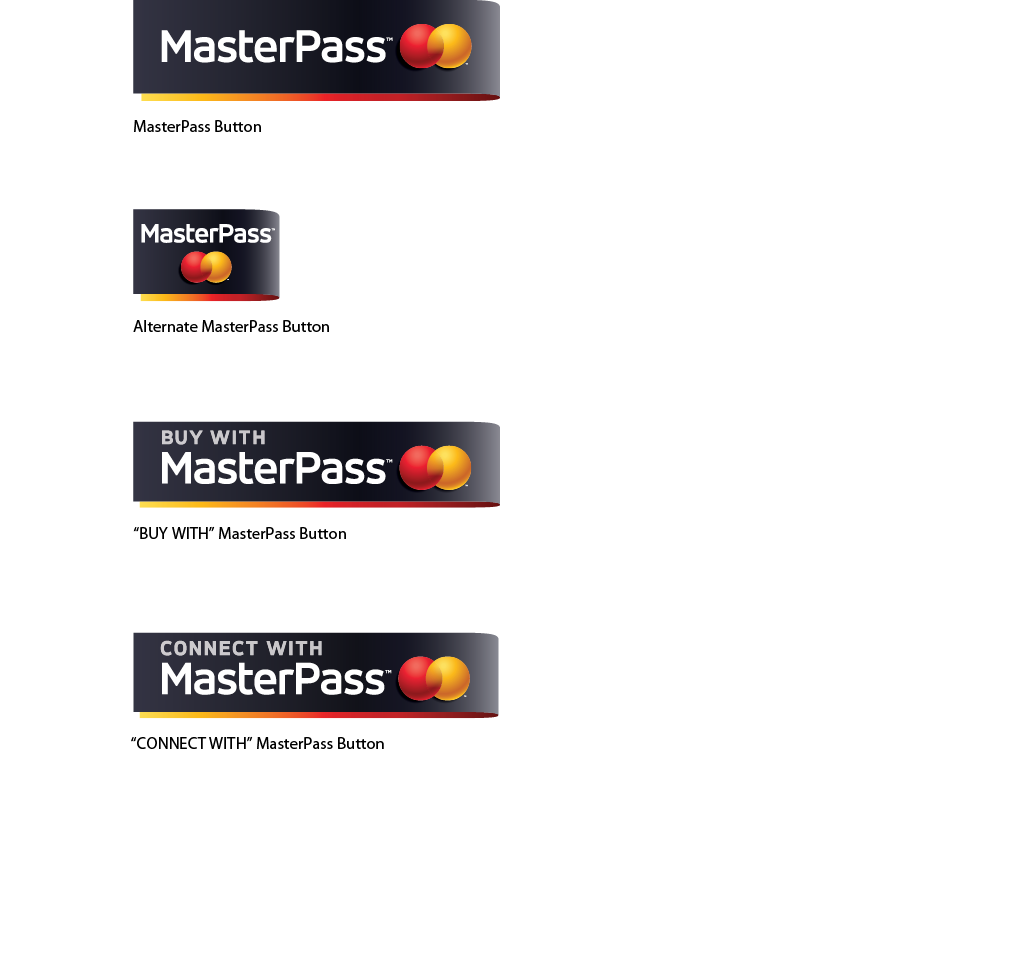
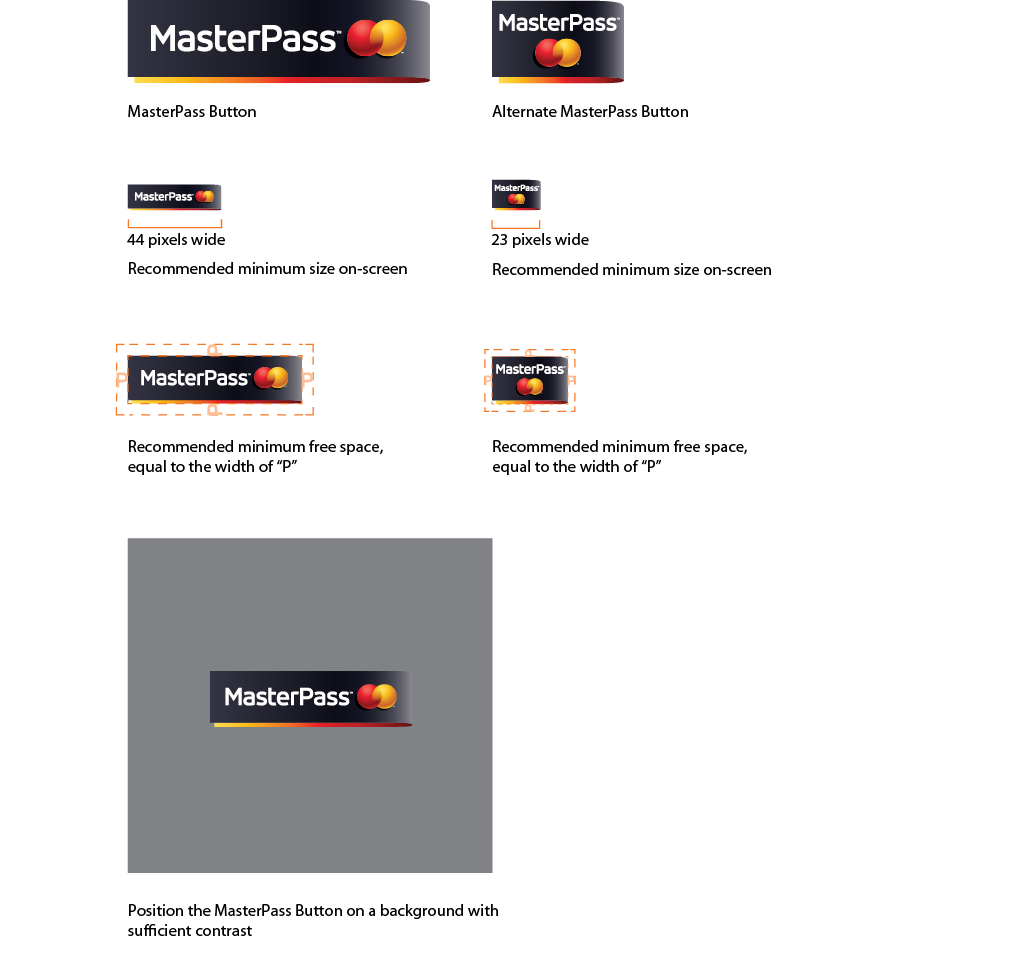
MasterPass Button
This is the element used most symbolically to represent MasterPass™ in marketing and is the preferred option on a merchant website when the merchant provides a payment prompt (see page 7).
Alternate MasterPass Button
Use this alternate Button in lieu of the MasterPass Button only if the alternate provides better parity with other payment brands in a particular context / layout than the preferred Button or when horizontal space is limited.
General Requirements
- Always integrate the Button as far forward as possible in the checkout experience (on the product page or the checkout page)
- To assist with consumer recognition, the Button generally should not be displayed in line with traditional payment brands
- The Button must appear in a size at least equal to the largest other payment brand marks also displayed and must be used in full-color on-screen
- Always reproduce the Button at a size that is clear and legible
- Always position the Button horizontally
- Always surround the Button with sufficient free space, which at a minimum should equal the width of the “P” in “MasterPass”
- Always position the Button on a background with sufficient contrast
- To minimize the impact of future branding updates, please link to the appropriate Button image hosted by MasterCard rather than downloading it and hosting the image locally. Links to the Button can be found in the Merchant Integration Guide under the MasterPass Branding section
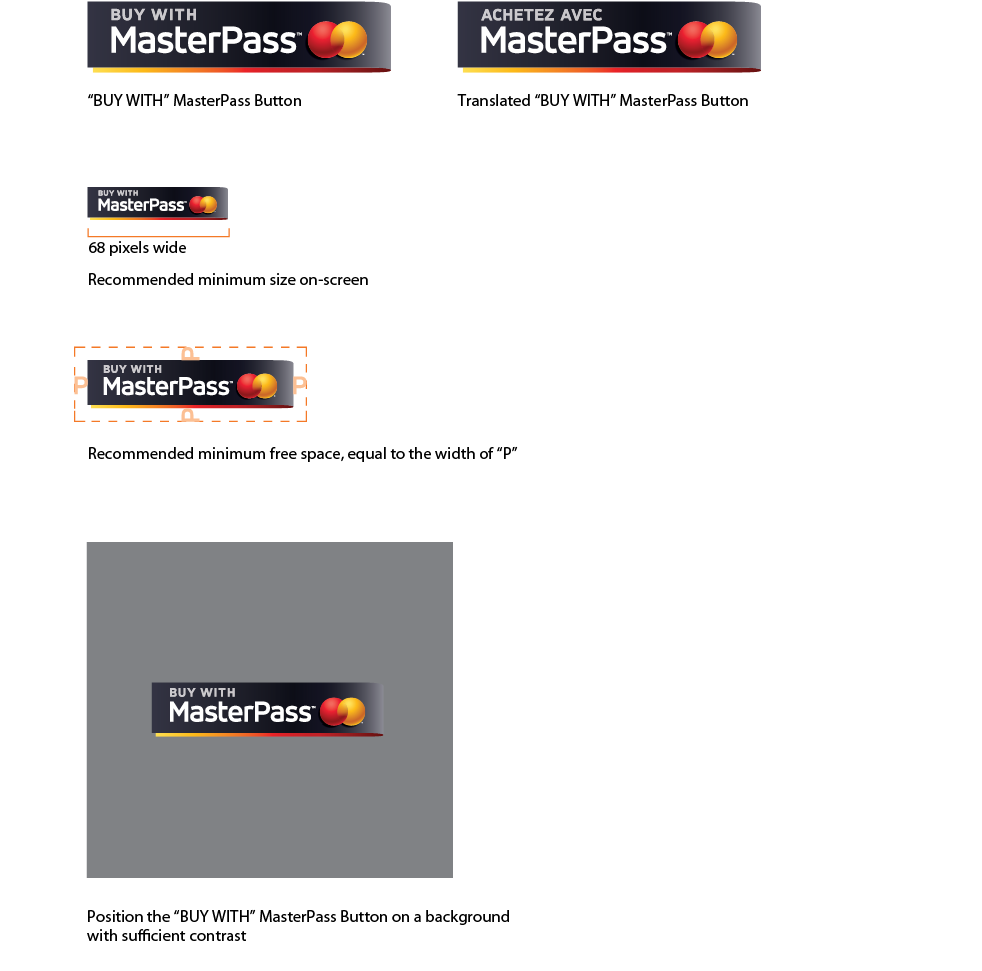
“BUY WITH” MasterPass Button
This Button is the preferred option at merchant checkout when the merchant does not provide a payment prompt (see page 7) and may be used symbolically to represent MasterPass™ in marketing.
General Requirements
- Always integrate the Button as far forward as possible in the checkout experience (on the product page or the checkout page))
- To assist with consumer recognition, the Button generally should not be displayed in line with traditional payment brands
- The “BUY WITH” Button must appear in a size at least equal to the largest other checkout button also displayed and must be used in full-color on‑screen
- Always reproduce the “BUY WITH” Button at a size that is clear and legible
- Always position the “BUY WITH” Button horizontally
- Always surround the “BUY WITH” Button with sufficient free space, which at a minimum should equal the width of the “P” in “MasterPass”
- Always position the “BUY WITH” Button on a background with sufficient contrast
- To minimize the impact of future branding updates, please use the country specific link to the “BUY WITH” Button image hosted by MasterCard rather than downloading it and hosting the image locally. Links to the “BUY WITH” Button can be found in the Merchant Integration Guide under the MasterPass Branding section
Certain markets require translation of “BUY WITH.” The list of countries and languages currently supported can be found on the developer zone at this link: https://developer.mastercard.com/portal/display/api/MasterPass+-+Merchant+Checkout+- +FAQs
If you need translation for a language not currently available please contact your MasterCard Representative.
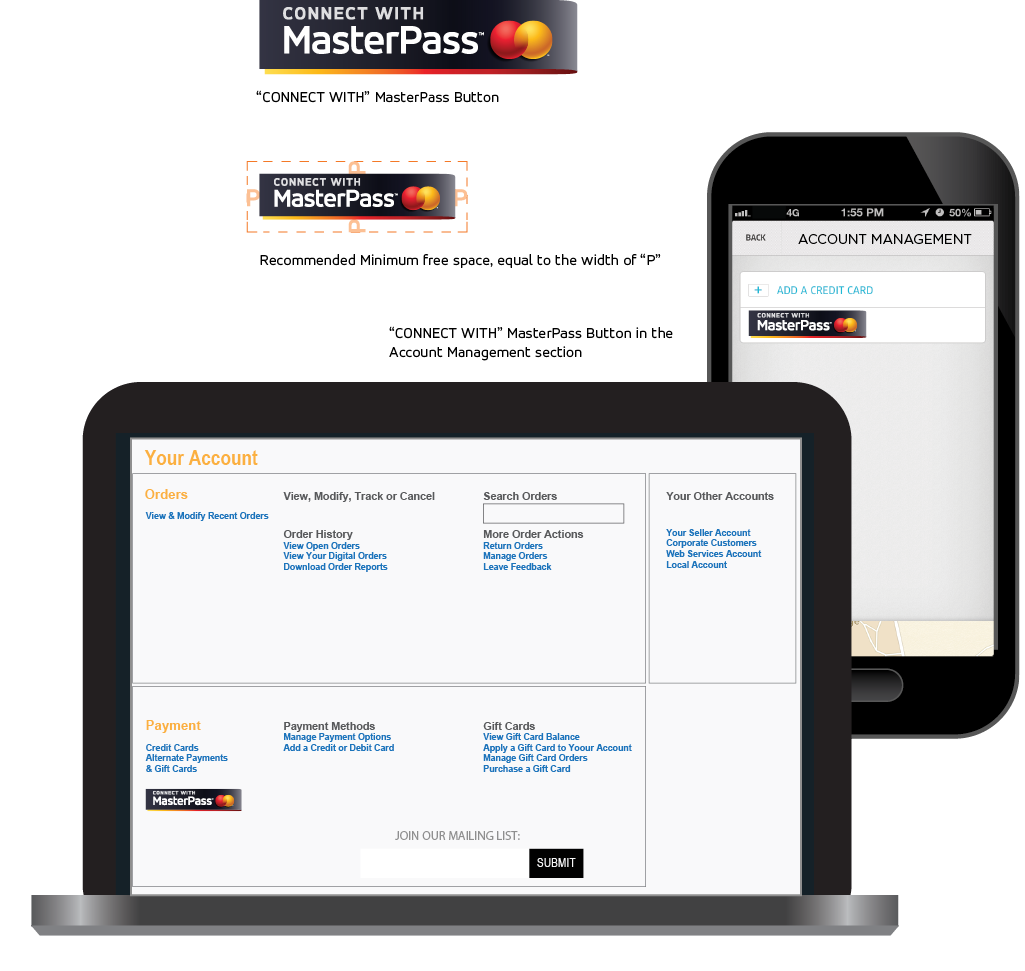
“CONNECT WITH” MasterPass Button
A consumer may consent to connect their wallet with a merchant to make purchases even easier. Once the consumer connects their wallet by clicking the “CONNECT WITH” MasterPass ™ Button, the merchant receives certain information* to personalize and simplify the consumer’s shopping experience. Subsequent checkout is streamlined, requiring only the consumer’s password.
*This information may include:
- Profile Information
- Addresses
- Card Details (without the actual card number)
- Loyalty Information
A merchant may place this Button anywhere on their site except on checkout pages or pages where payment is initiated. It is strongly recommended to be placed in the Account Management section.
- The same requirements apply as for the “BUY WITH” Button
- To minimize the impact of future branding updates, please use the country specific link to the “CONNECT WITH” Button image hosted by MasterCard rather than downloading it and hosting the image locally. Links to the Button can be found in the Merchant Integration Guide under the MasterPass Branding section.
Certain markets require translation of “CONNECT WITH.” The list of countries and languages currently supported can be found on the developer zone at this link: https:// developer.mastercard.com/portal/display/api/MasterPass+- +Merchant+Checkout+-+FAQs
If you need translation for a language not currently available please contact your MasterCard Representative.
On a merchant website, the type of Button displayed is dependent on the type of function it performs.
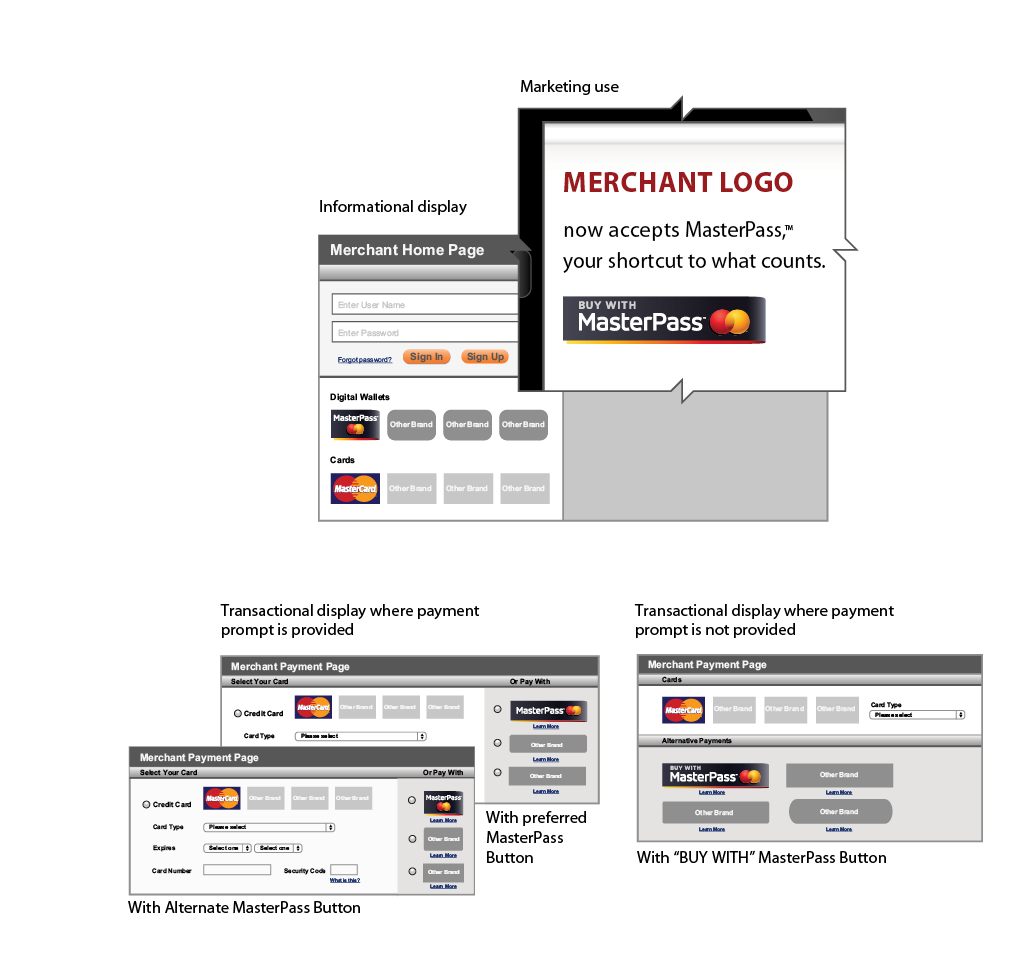
Informational Display
An informational display is where the merchant displays what payment brands are accepted on the merchant’s site. The MasterPass Button and Alternate Button are available for this use.
While the MasterPass Button is the preferred element for Informational Display, the Alternate MasterPass Button is an acceptable alternative only if it provides better parity with other payment brands in a particular context/layout than the preferred Button or when horizontal space is limited.
Transactional Display
Transactional Display is where the merchant displays the payment options for selection, and once selected, the payment transaction commences. MasterPass is required to be presented as a payment option in all instances of a consumer experience where payment information is requested from consumer for transaction purposes, for both new and returning customers. MasterPass Buttons are selected based on the following criteria:
- When the merchant does not provide a payment selection prompt, then the “BUY WITH” MasterPass Button is used. The “BUY WITH” Button is always the preferred option to trigger the checkout process
- When the merchant provides a payment selection prompt such as “Pay with,” “Select Payment Method,” or similar, then the MasterPass Button is used (following the same parity/ available space criteria mentioned above)
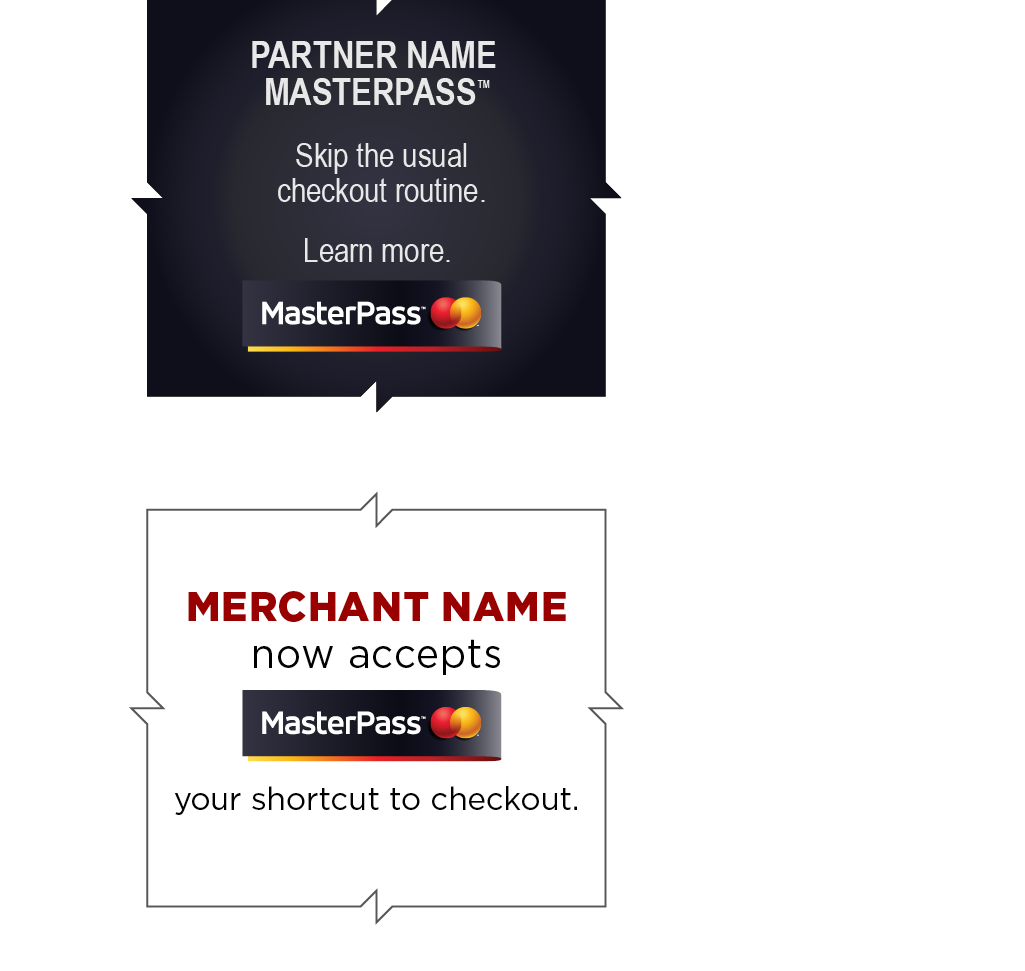
Marketing
The Buttons can also be used for marketing purposes, both on and offline. The choice of element used is at the merchant’s discretion and should be based on the context in which it appears.
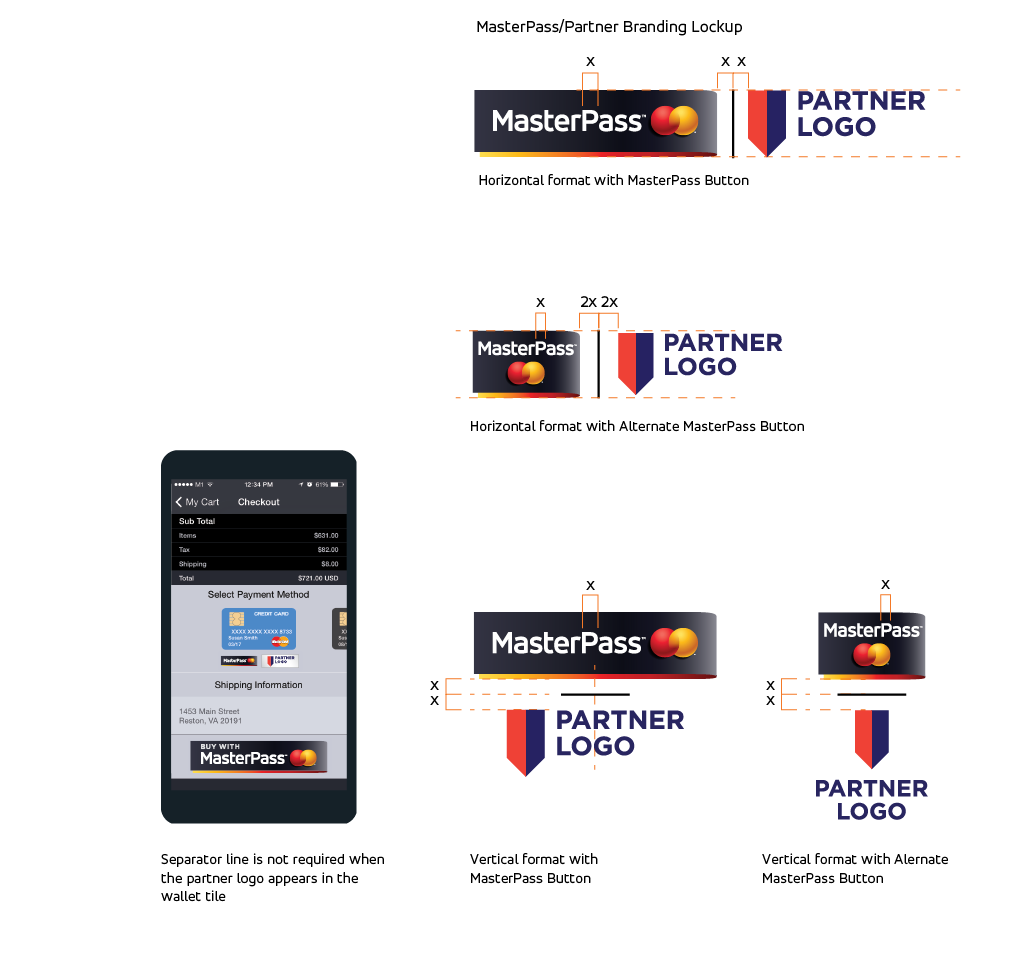
A MasterPass™ Button is required on a page where the merchant displays pre-checkout MasterPass wallet data. Its purpose is to remind the consumer which wallet they have selected and from where the information is being sourced.
The MasterPass Button is preferred for this function. The Alternate MasterPass Button may be used when space is limited or to achieve better parity with the wallet partner’s logo
Branding Lockup for Confirm Order Pages
Transactional Display Use
- Element integration: The link to the active MasterPass ™ tansactional display element outlined in the Merchant Integration Guide must be used instead of a static image. If updates to the element are made later, the merchant will not have to change anything on the site
- Element click through: When a consumer clicks a MasterPass Button, it must take the consumer to the wallet rather than another part of the merchant website for manual inputs
- Placement: Place the MasterPass transactional display Button at the start of the checkout experience alongside the guest checkout option, on product pages, and / or on the checkout page to minimize manual consumer inputs
Leveraging Data from the Wallet
- Shipping Address should be asked after the MasterPass checkout Button has been displayed, as MasterPass can provide shipping and billing address for the checkout
- CVC information has been collected and validated at the time the card is entered into the wallet. There should be no additional requirement for the consumer to enter it at the merchant website
For more detailed information about merchant integration, refer to the MasterPass Merchant Onboarding and Integration Guide available at: https://developer. mastercard.com/portal/display/api/MasterPass+- +Merchant+Checkout+-+Documentation

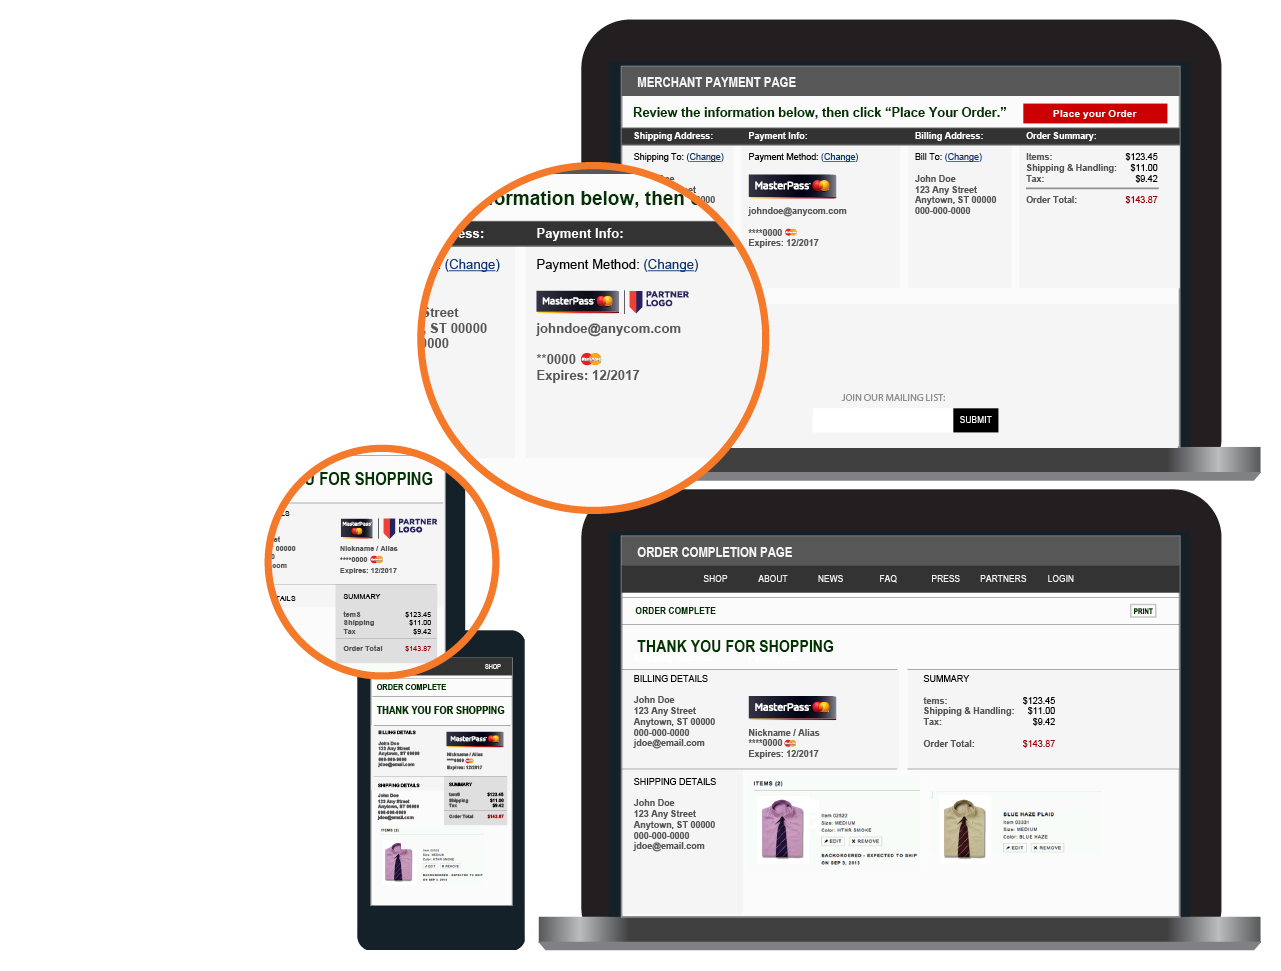
Confirm Order Page
Once the consumer is directed from the wallet, a MasterPass ™ Button appears on the Confirm Order page as shown, confirming the consumer has selected MasterPass as their payment method.
If a consumer chooses to change the payment method on the Confirm Order page after selecting MasterPass as the payment method:
- The minimum requirement is to present all available payment options to the consumer, including MasterPass
- The recommended best practice is to redirect the consumer back to MasterPass in order to change the payment and/or shipping details. It is not recommended to allow the customer to directly edit payment information on the merchant site if MasterPass was the original payment method selected
- If the consumer chooses a payment method different from MasterPass and/or changes the billing information directly on the merchant site, it would no longer be considered a MasterPass transaction
When MasterPass provides pre-checkout data to the merchant, always provide a MasterPass Button (or MasterPass/Partner Lockup for MasterCard-hosted MasterPass wallets and for Partner-hosted MasterPass API wallets as shown in the orange magnifications as shown), for each data element. If more than one data element appears in the same data field, the Button is required to appear only once.
Order Completion Page
After the consumer completes their order, a MasterPass Button (or MasterPass/Partner Lockup) appears on the Order Completion page as shown, confirming the consumer has selected MasterPass as their payment method along with other summary information, including order number, billing details, shipping details, costs, and items purchased.
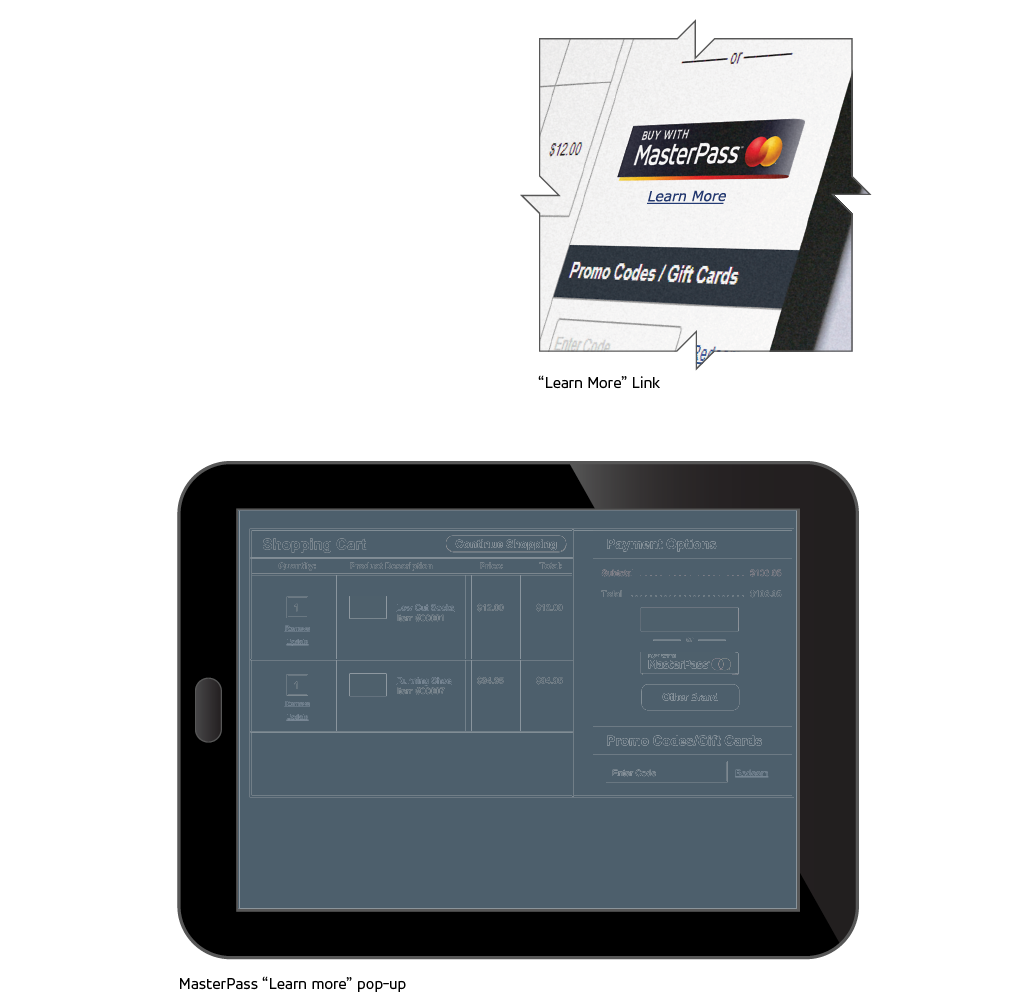
A “Learn More” link is required in association with the MasterPass™ Button and must be presented where the MasterPass payment selection is made, and also may be used with MasterPass Buttons elsewhere on the merchant’s website. The message gives the consumer the option to learn more about MasterPass and may appear as a pop-up window, rollover, or a tooltip.
- The “Learn More” link must be presented throughout all instances of the checkout experience, and must be labelled as such
- The “Learn More” link should be in close proximity to a MasterPass Button
- MasterCard will provide the “Learn More” feature to merchants with the Buttons and may update or change the language and graphics at any time in order to improve the user experience
- “Learn More” must link to the MasterCard-hosted page provided, rather than hosting it directly on the merchant website
The list of countries and languages currently supported can be found on the developer zone at this link: https://developer.mastercard.com/portal/display/api/ MasterPass+-+Merchant+Checkout+-+FAQs
If you need translation for a language not currently available please contact your MasterCard Representative.
When MasterPass ™ is used in communications within text or a headline, it should be set in the same typeface as the surrounding text. Always set MasterPass as a single word with no space between “Master” and “Pass.” “M” and “P” should be capital letters.
NOTE: “MasterPass” may not be translated (exceptions may apply).
The MasterPass name may be used with or without reference to MasterCard,® as befits the specific communication intent. “MasterPass by MasterCard” is permitted; “MasterCard MasterPass” is not permitted. If MasterCard is used, always set MasterCard as a single word with no space between “Master” and “Card.” “M” and “C” should be capital letters.
In the first or most prominent use of MasterPass or MasterCard on a page, the ™ and ® symbols respectively are required. In subsequent uses, the ™ and ® may be omitted.
When a merchant refers to MasterPass in marketing, the following legal line must be included somewhere on the page: “MasterPass and the spheres are trademarks of MasterCard International Incorporated.”
When a merchant refers to MasterCard in marketing, the following legal line must be included somewhere on the page: “MasterCard and the MasterCard Brand Mark are registered trademarks of MasterCard International Incorporated.”
Using “express” and “connected” checkout in text
The terms “express checkout” and “connected checkout” are not trademarks, and therefore, should not be usedor implied as such. Use a lower case “e,”and “c” and “c,” and “c” respectively unless in a headline that requires initial capitalization.
The proper term is “connected,” rather than “connect.”
If after reading the MasterPass ™ Branding Requirements for Merchants Document you still have questions or need more information, please contact MasterCard:
For information about brand requirements, contact the Identity Specialists via email at identity_specialists@ mastercard.com, or call the Brand Identity Hotline at 1-914-249-1326.
For information about MasterPass Integration, please email merchant_support@masterpass.com.